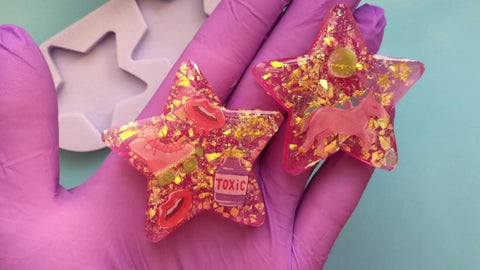
Tutorial: how to make resin charms
Supplies needed
- Resin mold - I am using the 2 inch Star Silicone Mold
- Epoxy resin
- Stickers
- Iridescent white glitter
- Iridescent white cellophane flakes
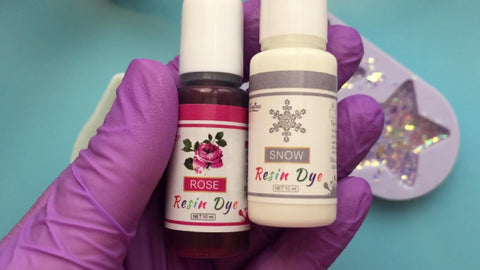
- Resin dye - I am using Rose resin dye and White resin dye
Instructions
Start by preparing your epoxy resin and mix it as per your brand's instructions. Different brands vary from one another so it's important to refer to the mixing instructions, especially if you are using a brand of resin for the first time. If you're new to resin crafting, keep in mind that being exact in the mixing ratio, and also mixing well, is crucial for your resin to cure. Otherwise you might end up with a gooey mess.
Pour some resin into your mold. Do not fill the mold up to the top - only pour a small layer for this step. This is for two reasons. The first being that we will later pour a second layer to add color. The second reason is that a thin layer is very helpful since we will be adding stickers to it. When working with stickers a thin layer is beneficial to help reduce the chance of the stickers floating when the resin is curing.

Start adding your stickers using a toothpick or a pointed tool. Whatever tool you opt to choose, be careful not to scratch or damage your mold (especially if you use plastic molds).
Try inserting the stickers into the resin at angle to avoid getting air bubbles in between the sticker and the resin.
Fully submerge the stickers into the resin to avoid having them move around during the curing process. What I like to do is move the sticker around as soon as I put it in, and then place it in the desired spot. If need be, I move resin on top of it to have it fully submerged. You can view the video found at the end of this article for a visual.
If your resin is too runny, wait before adding your stickers, otherwise they will keep floating and moving around. On the other hand, do not wait too long because if the resin is too thick you will form bubbles when inserting the stickers, or worse the resin has solidified and you will be unable to insert them.

Whilst the resin is still sticky, sprinkle on your glitters. For my charms I first added a small amount of the iridescent white glitter and then lots of the iridescent cellophane flakes. I suggest adding the glitter when it's still sticky so that the glitter will not float when your pour your next layer of resin.
When you finish adding your glitter, wait for the first layer of resin to solidify. This is important because if the first layer has not solidified, your layers will mix and you will most likely disturb the first layer (along with the stickers) when pouring your second layer.


The next step is to prepare another batch of resin. For coloring my second layer I used 2 drops of Rose resin dye and 3 drops Snow resin dye.
Adding too much dye can disrupt your resin's curing process. So make sure to add small amounts at a time. For more information on this refer to the article 'Why is my resin bendy?'.
Mix your dye well - at least for 3 minutes to ensure equal distribution and equal curing all over your resin charm.

Pour your colored resin into the mold. This time you can fill the mold all the way to the top.Then wait for the resin to fully cure.

De-mold your resin charms from the mold. If you are using plastic molds you might find the article 'How to de-mold resin from plastic molds' very helpful.

To make your resin charms shiny, you can dome them with resin. When doing so make sure that you are working on a leveled surface. You will be pouring resin on the surface of your charm to create a dome by adding small amounts of resin at a time and moving them to the edges. You can view the video at the end of this article for a visual of this.

Once the doming layer has cured, your resin charms are finished. You can now turn them into pendants, earrings, magnets or whatever your heart desires.

I hope that you have found this tutorial helpful. If you have any questions feel free to leave a comment on the video linked below. I am happy to help anyway that I can.
View the video here: