Creating a Rainbow Drop Wall Art: Resin Tutorial

Welcome to another resin tutorial. If you're new to resin, don't worry! This tutorial is designed to be beginner-friendly. The step-by-step instructions provided below will guide you through the process of creating this resin project. It is designed to be fun, simple and easy, making it suitable for beginners and experts alike.
Supplies
For this project you will need the following craft supplies:
- epoxy resin
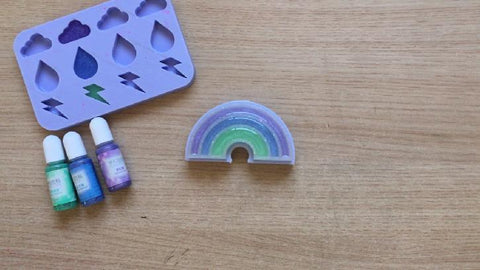
- Rainbow Silicone Mold
- Cloud, Raindrop & Thunder Bolt Silicone Mold
- mixing cups and sticks
- White Pearl resin pigment
- iridescent white fine glitter
- iridescent white cellophane flakes
- green glitter resin pigment
- blue glitter resin pigment
- purple glitter resin pigment
- findings: eye screws, jump rings and ball key chain/ string
A video showing how to make this project is also available on my YouTube channel:
Instructions
Step 1: Prepare resin as per brand instructions. Make sure to mix well.
Step 2: To the resin add white pearl resin pigment, iridescent white fine glitter and iridescent white cellophane flakes.

Step 3: Mix the white resin mixture thoroughly for around 2-3 minutes, ensuring that the pigment has been evenly distributed.
Step 4: Fill the rainbow silicone mold with the white resin mixture until it's completely filled.

Step 5: Allow the resin to cure for approximately 24 hours, unless otherwise specified by the instructions of the resin brand you are using.
Step 6: After the resin has completely cured, remove the rainbow from the silicone mold.

Step 7: Mix and prepare some resin and divide it into 3 mixing cups.

Step 8: Add purple pigment to the first cup, blue pigment to the second cup, and green pigment to the third cup.

Step 9: Mix each cup well for approximately 2-3 minutes, making sure that the pigment has been evenly and thoroughly distributed into the resin.

Step 10: Start by pouring the purple resin mixture into the outer layer of the rainbow. Then pour the blue resin mixture into the middle section, and the green resin mixture into the inner most (and final) layer.
Make sure to add the resin slowly, and add small amounts as needed to avoid an over-spill. If you need some guidance for this step, watch the video linked above.
Fill these cavities all the way through - this will be the final layer added to the rainbow, unless you prefer to finish yours off with a doming layer.

Step 11: Use the rest of the resin to make the cloud, raindrop and lightning bolt. You will only require one of each shape for this project. I opted for a purple cloud, blue raindrop and green lightning bolt.
Make sure the pieces are thick enough for a hole to be drilled at the top (if you choose not to fill the mold completely).

Step 12: Allow the resin to completely cure for approximately 24 hours, unless otherwise specified by the instructions of the resin brand you are using.
Step 13: When the resin has fully cured, it's time to admire your lovely rainbow creation 😊 and to de-mold the cloud, raindrop and lightning bolt from the mold.


Step 14: Plan out the placement of the charms in alignment to the rainbow, and arrange the charms in a way that aligns with the colors of the rainbow as shown in the photo below.

Step 15: Drill a hole at the top of each charm, including the rainbow. Then drill 3 holes at the bottom of each rainbow.
Step 16: Add eye screws to each hole.
Step 17: Add a jump ring and ball key chain/ string to the eye screw at the top of the rainbow.
Step 18: Add a jump ring to each eye screw of the cloud, raindrop and lightning bolt. Then attach each charm to the eye screws at the bottom of the rainbow.
