Resin Tutorial: Watermelon Coaster
Welcome to this exciting watermelon coaster resin tutorial! Are you looking for a fun and unique way to add some personality to your home decor? Look no further than this vibrant and colorful watermelon coaster! In this tutorial, I will guide you through the step-by-step process of creating your own watermelon coaster using epoxy resin and a few simple materials. Whether you're a seasoned resin artist or a beginner looking to try something new, this tutorial is sure to inspire you to get creative and make something truly special. So, let's get started and make an adorable watermelon coaster that will be the perfect addition to any summer gathering or picnic!
Craft Supplies
For this project you will need the following craft supplies:
- epoxy resin
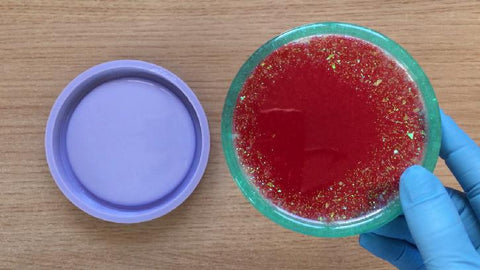
- coaster silicone mold
- mixing cups
- mixing sticks
- green pearlescent resin pigment
- red pearlescent resin pigment
- red alcohol ink
- iridescent white cellophane flakes
- iridescent white fine glitter
Video Tutorial
A video tutorial showing the steps explained below is also available on my YouTube channel:
Instructions
Step 1: Prepare and mix a batch of epoxy resin as per manufacturer's instructions.
Step 2: Add green resin pigment to the resin.
Step 3: Mix the resin well making sure that the pigment has been thoroughly and evenly distributed to avoid any issues with the resin curing.

Step 4: Pour the green resin mixture into the rim of the coaster silicone mold. Fill this section all the way through.
Step 5: Wait for the resin to cure.

Step 6: Prepare and mix a batch of resin as per manufacturer's instructions.
Step 7: Divide the resin into 2 mixing cups.
Step 8: To one cup add cellophane flakes and white glitter.
Step 9: To the other cup add red alcohol ink and red pearlescent resin pigment.
Step 10: Mix each cup well.

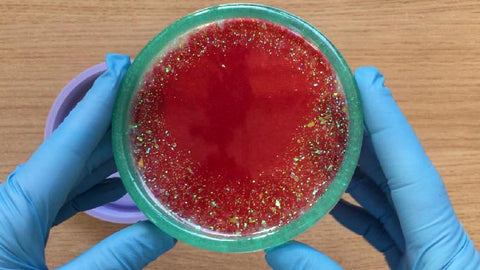
Step 11: Pour the glittery resin mix around the edges of the coaster silicone mold.

Step 12: Pour the red resin mixture at the center of the mold.

Step 13: Repeat steps 11 and 12 as needed until the mold is full.
Step 14: Wait for the resin to cure.

Step 15: When the resin has fully cured, de-mold the coaster from the silicone mold.
And there you have it, your very own beautiful and unique watermelon coaster! With a few simple materials and some patience, you have created a practical and stylish addition to your home decor that will be the envy of your friends and family. Not only is this coaster perfect for protecting your furniture from condensation and spills, but it also serves as a fun and whimsical conversation starter. Experiment with different colors and designs to create a set of coasters that truly reflect your personality and style. I hope this tutorial has inspired you to get creative and explore the endless possibilities of epoxy resin art. Happy crafting!