Easy Resin Tutorial: DIY Heart Earrings
This project is beginner friendly and super fun to make. The process consists of two main steps - we will first make tiny hearts which will then be embedded into larger hearts that will be the main pieces. I opted to include some heart confetti to add more depth to the pieces. Feel free to customize the project to your liking and based on what supplies you have available. Continue reading for a list of supplies needed, a video tutorial, and step by step instructions.
The supplies needed for this project are:
- mixing cups & sticks
- epoxy resin
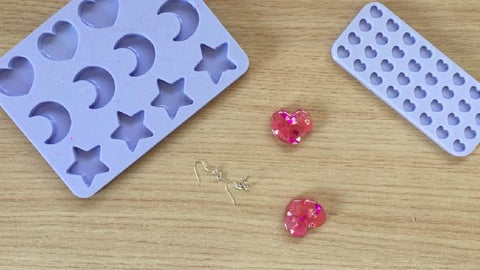
- 1 cm Hearts Silicone Mold
- Heart, Moon & Star Silicone Mold
- 3 different shades of pink pearl resin pigment - I used Rose Red, Peach Pink and Sakura Pink
- white pearl resin pigment
- iridescent pink glitter
- heart confetti in different shades of pink
- findings: earring hook x2, jump ring x2 & eye screw x2
A video tutorial is also available on my Youtube channel - linked down below ⬇
Step 1: Prepare your resin as per manufacturer's instructions.

Step 2: To the mixing cup add a few drops of the Sakura Pink (or lightest shade available) of pink pigment. Mix well.
Step 3: Using this mixture, fill up a minimum of 4 heart cavities of the 1 cm Hearts Silicone Mold.

Step 4: To the same mixing cup then add a few drops of Peach Pink (or medium shade chosen) resin pigment and mix well.

Step 5: Pour the resin mix into a minimum of 4 heart cavities.

Step 6: To the same mixing cup add a few drops of white pearl resin pigment and mix well.

Step 7: Pour the resin mix into a minimum of 4 heart cavities.

Step 8: To the same mixing cup add a few drops of Red Rose (or darkest shade available) pearl resin pigment and mix well.

Step 9: Pour the resin mix into a minimum of 4 heart cavities.

Step 10: For the final shade, add iridescent pink glitter to your resin mixture and mix well.

Step 11: Pour the resin mix into a minimum of 4 heart cavities.

Step 12: Wait for the resin to cure.

Step 13: When the resin has finished curing, de-mold the tiny hearts from the silicone mold.

Step 14: Prepare a batch of resin as per manufacturer's instructions and pour a thin layer into 2 of the large hearts of the Heart, Moon & Star Silicone Mold.

Step 15: Start by embedding the tiny hearts into this first layer. You may want to use a wooden toothpick to help you place the hearts as needed.

Step 16: Next add some heart confetti in different shades of pink. You can also add some iridescent white ones.

Step 17: Using a wooden toothpick or a pointed thin tool, gently poke the confetti to fill up the gaps in between the embedded resin hearts.

Step 18: Place more of the resin hearts.

Step 19: Add a small amount of resin if needed.

Step 20: Add more heart confetti and again use your pointed tool to fill some of the gaps with the confetti.

Step 21: Wait for the resin to cure.

Step 22: As soon as the resin has finished curing, de-mold the hearts from the silicone mold.

Step 23: Using a driller with a very thin drill bit (match it to your eye screws), or using a dremel tool, drill a hole at the top of each heart.

Step 24: Prepare your findings and attach them to your heart charms. At this stage you may want to use some resin or glue to add the findings more securely. I normally opt to dip the eye crew into some resin before screwing it into the resin piece.
Your heart resin earrings are complete. I hope that you enjoy making this little project as much as I did 💗
