Tutorial : Starry Night Sky Resin Coaster - DIY Gift for an outdoorsy person
This is a step by step tutorial for making an outdoorsy themed resin coaster using epoxy resin. It's a super fun project to make and will make a great gift for someone special if you don't make this for yourself.
This tutorial is beginner friendly. So don't worry if you're new to resin - all you need to do is gather your supplies and follow the steps!
The best thing about this project is that it's easily customizable by using different colors and/or image. You can also use this as an inspiration and apply it to a completely different theme. It will be your coaster to make, so the important thing is that you have fun making it and I hope that you find this tutorial helpful or inspirational :)
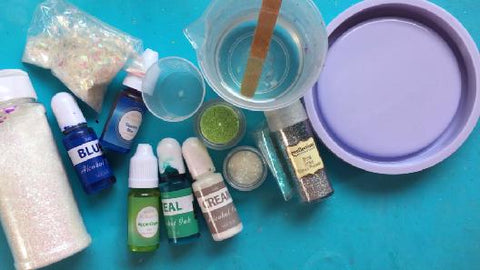
The supplies needed for this project are as follows:
- epoxy resin
- Coaster silicone mold
- 3 mixing cups & sticks
- fine iridescent glitter: white & green
- white iridescent cellophane flakes
- light blue chunky iridescent glitter
- white iridescent glitter strips
- fine holographic silver glitter
- alcohol inks: blue, teal & cream
- pearl pigments: sapphire blue & apple green
- permanent black pen (Medium tip)
- top coat
Step 1: Gather all of your supplies
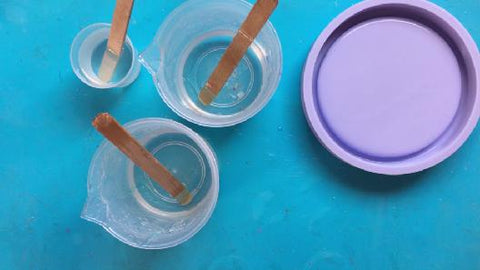
Step 2: Prepare your resin by mixing the two parts according to the instructions of the resin brand that you are using. For best results, measure the resin as accurately as possible.
Step 3: Divide your resin into 3 mixing cups.
For one of the cups you only need around a 1/3 of each of the other portions - this will be for the white resin mix, referred to as the first cup in the next step.
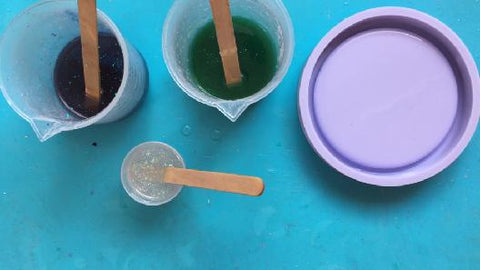
Step 4: To the first cup add: fine holographic silver glitter, white iridescent glitter strips, fine iridescent white glitter and white iridescent cellophane flakes.
To the second cup add: fine iridescent green glitter, teal alcohol ink, cream alcohol ink and apple green pearl pigment.
To the third cup add: light blue chunky iridescent glitter, fine iridescent white glitter, blue alcohol ink and blue pearl pigment.
Step 5: Mix each cup well for at least 2 minutes to make sure that the pigments and inks have been thoroughly mixed and equally distributed.
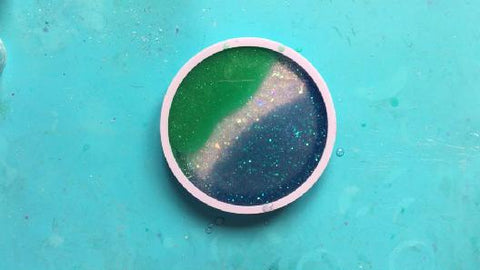
Step 6: Start by pouring some of the blue resin mix at one end of the coaster mold.

Step 7: Right away pour some of the green resin mix at the opposite end of the coaster mold.

Step 8: Right after, pour half of the white resin mixture in the middle of the coaster mold.

Step 9: Keep adding each color gradually until the mold is full and you have the effect shown in the photo below.
Step 10: Wait for the resin to cure. The amount of time you wait will depend on what resin brand/type you are using. How hot or cold the weather is will also affect curing time - it will take longer in winter and shorter in summer.
Generally you will have hard and smooth cured resin after 24 - 48 hours.
If your resin is still bendy after a couple of days feel free to troubleshoot it through this article - Why is my resin bendy?
Step 11: De-mold your resin coaster once the resin has finished curing.
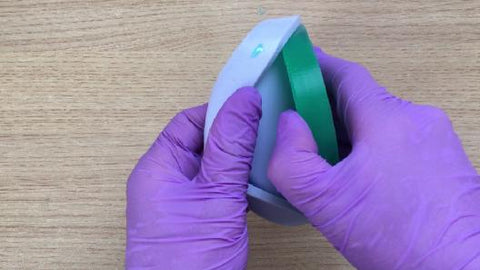
If you are using this silicone mold, you will get a nice shiny coaster.

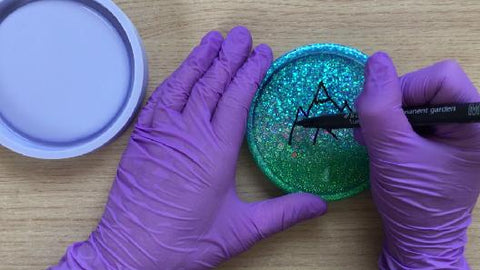
Step 12: Grab your permanent black pen with a medium tip and draw the image on the face of the resin coaster.
If you are unsure on how to attempt drawing the image, feel free to watch the video tutorial linked below at the end of this tutorial.
If you make any mistakes, the marker can be gently scratched off or wiped to remove mistakes made. It does not show in the photos but I did re-touch my last E (after I finished filming and photographing 🙄😅) by using a wooden toothpick.
Step 13: To protect your drawing, glaze the coaster with a clear top coat.
Once the top coat is dry, your coaster is ready to gift or for you to enjoy!
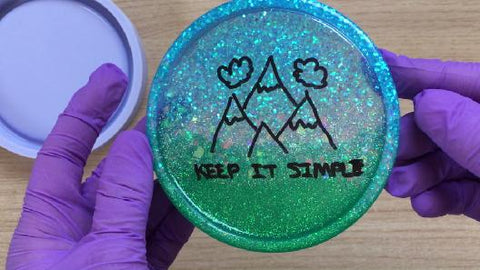
Feel free to use a different image or colors. A great idea would be to make a set of 4 coasters with different images on them.
Watch the video here: