Resin Tutorial: ❄ Snowflake resin shaker

Resin shakers are a popular and versatile craft project that allow you to create unique and eye-catching pieces. Whether you're a beginner or an experienced crafter, making a resin shaker is a fun and rewarding activity. In this blog post, we will guide you through the step-by-step process of creating your own resin shaker.
Overview
Basically there are 3 parts involved to create a resin shaker. You first need to create the shaker base. You then place the embellishments into the shaker base and finally seal the shaker. If you want to make a liquid shaker, there is an extra step, where you will need to drill a hole and fill the shaker with liquid shaker oil. Keep reading for step by step instructions and a video tutorial.
Video Tutorial
Craft supplies
For this project you will need the following craft supplies:
- epoxy resin
- mixing cups
- mixing sticks
- snowflake shaker silicone mold
- snowflakes silicone mold
- iridescent white cellophane flakes glitter
- iridescent white fine glitter
- holographic silver fine glitter
- light blue mica pigment powder
- iridescent white snowflake confetti
- sky blue alcohol ink
- paintbrush
- white acrylic paint
- embellishments for shaker inserts (e.g. tiny pearls, confetti and gems)
- acrylic shaker lid or transparent film
- UV resin (optional)
- shaker liquid (optional)
Instructions
Step 1: Measure and mix epoxy resin as per brand instructions.

Step 2: To the resin add iridescent white cellophane flake glitter.
Step 3: To the resin add iridescent white fine glitter.

Step 4: To the resin add a small amount of holographic silver fine glitter.

Step 5: Mix the resin well.

Step 6: Pour the glittery resin mixture into the snowflake shaker silicone mold. Do not fill the mold all the way at this stage - only up to 80% full.

Step 7: To the remaining resin mixture add a small amount of light blue mica pigment powder. Mix well.
Step 8: Pour the light blue resin mixture into the snowflake shaker silicone mold, filling the mold all the way.

Step 9: To the resin in the snowflake shaker mold, add iridescent white snowflake confetti. Start by placing the confetti onto the resin.

Step 10: Using a silicone tool or a wooden toothpick, embed the confetti into the resin by gently pushing them down.

Step 11: To the remaining resin add sky blue alcohol ink and an additional small amount of the light blue mica pigment powder. Mix well.

Step 12: Pour the blue resin mixture into the tiny snowflakes mold.

Step 13: Wait for the resin to cure.
Step 14: Once the resin has fully cured, remove the resin from the silicone molds.


Step 15: Paint the detail using white acrylic paint.

Step 16: Wait for the paint to dry.
Step 17: Clean off the excess paint. There are two method on how to do this:
Method 1: Use a cotton swab and rubbing alcohol/surgical spirit and wipe the excess paint off, or
Method 2: Submerge the resin pieces into a bowl of water and using your fingertip gently rub off the excess paint. (this is the method I opted for this time - watch the video for a demo) Make sure to dry off the pieces well before proceeding to the next step.
Step 18: Fill the shaker with the shaker inserts you made along with any other embellishments that you would like to add.

Note: if you are not using an acrylic shaker lid and making your own shaker lid using transparent film, prepare the transparent film now before proceeding to the next step.
Step 19: Add a small amount of resin to the edge of the shaker and place the shaker lid.
Note: To speed up the process, you can use UV resin (as shown in the video), but epoxy resin works too.

Step 20: Cure the UV resin using a UV lamp or wait for the epoxy resin to cure.
If you want to make a dry shaker, your project is complete. If you want to create a liquid shaker, continue to the next steps.

Optional additional steps to make a liquid shaker:
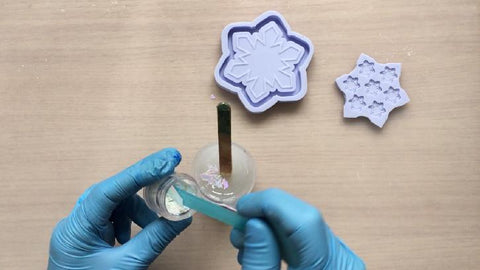
Step 21: Drill a hole at the side of the snowflake.
Step 22: Using a needle tip squeeze bottle, fill the shaker using liquid shaker oil.
Step 23: Seal the hole using some UV resin/epoxy resin, or if you want to turn the shaker into a charm, use an eye screw dipped into some resin to seal off the hole.
Here is a video showing how to make a liquid shaker: