Resin Tutorial: Spooky Halloween Decoration
Share

Craft Supplies
- epoxy resin
- mixing cups
- mixing sticks
- Spooky Silicone Mold
- orange pearl resin pigment
- black pearl resin pigment
- iridescent white cellophane flakes
- silver fine glitter
- holographic black chunky glitter
- holographic black cellophane flakes
- black acrylic paint
- white acrylic paint
- findings: eye screw x2, jump ring x2, ball chain with clasp
- rubbing alcohol or surgical spirit
A video showing how to make this project is also available:
Instructions
Step 1: Prepare and mix resin. Make sure to follow the measuring and mixing instructions provided with your resin.
Step 2: Divide the resin into 3 mixing cups into a ratio of 1:1:3.
Step 3: To the larger mixing cup add a small amount of resin pigment. Mix well.
Step 4: To one of the smaller resin mixtures, add black resin pigment, silver glitter, holographic black chunky glitter and holographic black cellophane flakes. Mix well.
Step 5: To the remaining cup add orange resin pigment and iridescent white cellophane flakes. Mix well.
Note: make this orange resin mixture darker than the one created in step 3.
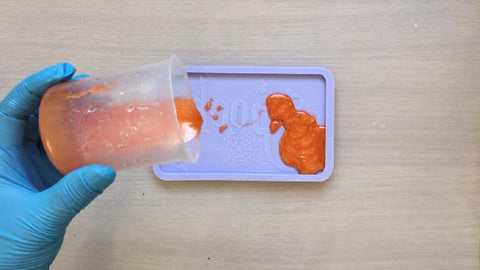
Step 6: Start by pouring the darker orange resin mixture at both ends of the silicone mold.

Step 7: Pour the black resin mixture in the middle of the mold.
Step 8: Pour the lighter orange resin mixture.
Step 9: Wait for the resin to fully cure.

Step 10: Remove the resin from the silicone mold.

Step 11: Drill two holes at the top of the resin piece.
Step 12: Place an eye screw into each hole.
Step 13: Paint the cobweb engraving using white acrylic paint.
Step 14: Use black acrylic paint to paint the wording and spider engraving.
Step 15: Wait for the paint to dry.

Step 16: Clean excess paint from the surface of the resin using rubbing alcohol or surgical spirit and a cotton swab.
Step 17: Add a jump ring to each eye screw.
Step 18: Add the chain.

I hope that you enjoy making this project as much as I did. I would love to see your creation. Tag me on Instagram @thecraftsandglittershop if you don't mind sharing 😊
If you have any questions, feel free to leave them in the comments section below.

