Resin Tutorial: Harry Potter coaster & matching bookmark
For this project you will need the following craft supplies:
- mixing cups
- mixing sticks
- epoxy resin
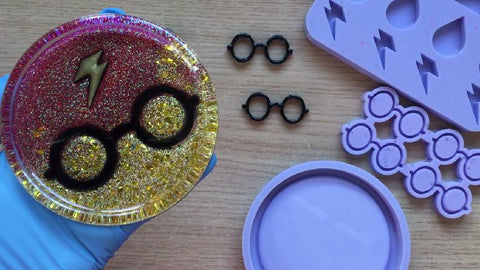
- small nerdy glasses silicone mold
- large nerdy glasses silicone mold
- thunderbolt silicone mold
- bookmark silicone mold
- coaster silicone mold
- black pearl resin pigment
- gold pearl resin pigment
- red pearl resin pigment
- red alcohol ink
- gold mica powder
- gold fine glitter
- holographic gold fine glitter
- iridescent red fine glitter
- metallic red fine glitter
- gold cellophane flakes
In this article you will find step by step instructions for this resin project. A video tutorial is also available on my YouTube channel:
Instructions
Step 1: Mix a batch of resin as per manufacturer's instructions.
Step 2: Add black pigment to the resin and mix well making sure to thoroughly and evenly distribute the pigment into the resin.

Step 3: Pour the black resin mixture into the glasses silicone molds. For the large glasses mold, only fill the frame area of the mold. For the small glasses mold, fill it all the way.

Step 4: To the black resin mix, add gold mica powder and mix well.

Step 5: Pour the golden resin mix into the thunderbolt silicone mold. You will need 2 thunderbolts for this project.
Step 6: Wait for the resin to cure.

Step 7: Remove the glasses and thunderbolts from the silicone molds once the resin has finished curing.

Step 8: Mix a batch of resin as per manufacturer's instructions.
Step 9: Pour the clear resin into the coaster silicone mold. Fill the mold half way.

Step 10: Place the large glasses and one of the thunderbolt charms onto the uncured resin.
If needed, use a mixing stick to move the pieces around to the desired spot.

Step 11: Wait for the resin to cure.

Step 12: Mix resin as per manufacturer's instructions.
Step 13: Divide the resin into 2 mixing cups.
Step 14: To one mixing cup add gold resin pigment, gold glitter, holographic gold glitter and gold cellophane flakes.
Step 15: To the other mixing cup add red resin pigment, red alcohol ink, iridescent red glitter and metallic red glitter.

Step 16: Mix each mixture well making sure to thoroughly and evenly distribute the pigments into the resin.
Step 17: Pour the red mixture towards the top section of the coaster and the gold mixture towards the bottom.

Step 18: Pour the red mixture towards the top section of the bookmark mold and the gold mixture towards the bottom section.
Step 19: Wait for the resin to cure.

Step 20: Remove the resin bookmark and coaster from the silicone molds once the resin has fully cured.

For the next and final part you will only need a tiny amount of resin.
Step 21: Prepare some resin as per manufacturer's instructions.
Step 22: Pour a few drops of resin at one end of the bookmark and place the thunderbolt onto the uncured resin.

Step 23: Pour a couple of drops just below the thunderbolt and place the small glasses onto the uncured resin.
Step 24: Wait for the resin to cure and your project is complete.


