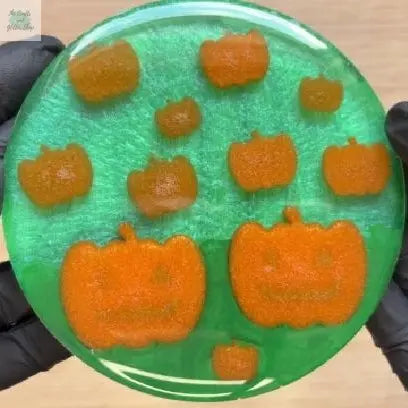
Autumn Craft Tutorial: Pumpkin Patch Coaster
As the weather gets cooler, there's nothing more comforting than cozying up with a warm drink, and what better way to enjoy it than with a handmade Pumpkin Patch Coaster? This craft combines the beauty of resin art with the festive spirit of autumn, creating a unique and functional piece of home decor.

If you're a resin art enthusiast, or just love crafting during the fall, this tutorial is perfect for you! In this post, I’ll walk you through each step to create your own Pumpkin Patch Coaster, and if you'd like to watch me make it, be sure to check out my YouTube video linked below.
Project Overview: Pumpkin Patch Coaster
In this project, we’ll be creating a charming Pumpkin Patch Coaster using epoxy resin. The coaster features layered pumpkins, giving it a fun and dimensional look that’s perfect for autumn decor. We’ll also be using resin pigments to achieve vibrant orange pumpkins and a rich green background, with optional acrylic paint details to enhance the final result.
This craft is great for resin beginners and enthusiasts alike, allowing you to practice layering, embedding, and pigment mixing. By the end, you’ll have a functional and decorative coaster that brings cozy fall vibes to your home!
Make sure to gather all your materials and follow along for a step-by-step breakdown of the entire process. If you'd like to see it in action and follow along, be sure to check out the video on my YouTube channel.
Craft Supplies Needed:
Before we dive into the steps, let's go over the materials you'll need for this project:
- 10 cm circle silicone mold
- pumpkins silicone mold
- epoxy resin
- mixing cups
- mixing sticks
- green acrylic paint
- pearl orange resin pigment
- orange resin pigment
- green resin pigment
- paintbrush

Step-by-Step Guide:
Step 1: Prepare and Mix the Resin
Start by preparing and mixing your resin according to the manufacturer's instructions. Make sure to work in a well-ventilated area and use protective gear, such as appropriate gloves and a mask.
Step 2: Pour the Base Layer

-
Pour a thin layer of clear resin into your circle silicone mold. Distribute the resin evenly and wait for it to cure completely.
Tip: This will eventually be the surface of your coaster, so ensure the resin layer is smooth and bubble-free for the best result.
Step 3: Make the Pumpkin Embellishments
-
To the remaining resin mixture, add both orange resin pigment and pearl orange resin pigment. Stir well to combine.
-
Pour this orange resin mixture into your pumpkins silicone mold. Wait for the resin to cure fully before proceeding.
Tip: You can vary the amount of pearl pigment to achieve different levels of shimmer in your pumpkins.

Step 4: Demold the Pumpkins
- Once the pumpkins have cured, demold them carefully from the silicone mold.

Step 5: Pour the Second Layer & Embed Pumpkins
-
Prepare a new batch of resin and pour another thin layer of clear resin into the circle silicone mold.

-
Embed some of the pumpkins into this layer, positioning them at one end of the circle to give the effect of a little pumpkin patch.

-
Let this layer cure completely.
Note: We’re going for a layered effect, so don’t worry about filling the entire mold with pumpkins just yet.
Step 6: Make More Pumpkins

-
With the remaining resin, mix in the orange and pearl orange pigments again. Pour this mixture into the pumpkins silicone mold and wait for it to cure.
Tip: It's always handy to have a few extra pumpkins in case you need more for layering!
Step 7: Paint the Green Background
- Once the clear resin has cured, it’s time to paint the background. Use green acrylic paint to cover the base of the coaster behind the pumpkins.
- Be sure to leave room for additional layers of embedded pumpkins in the next steps to add dimension. Wait for the paint to dry.

Step 8: Add More Pumpkins
-
Demold the cured pumpkins .
-
Prepare a new batch of resin
-
Pour another thin layer of resin into the mold and embed more pumpkins to create a multi-dimensional effect. Allow this layer to cure.
Note: Feel free to add additional layers if you'd like! I managed two layers of pumpkins in my coaster, but you can go for more. Just be sure to leave room for the final green resin layer.


Step 9: Final Green Resin Layer
- Prepare a fresh batch of resin, this time mixing in green resin pigment.
- Pour the green resin mixture into the mold, filling it all the way to the top. This will act as the final layer, adding a beautiful finish to the coaster. Wait for the resin to cure completely.

Step 10: Finishing Touches
- Once the resin has fully cured, carefully remove your coaster from the mold.

- To complete the look, paint the back of the coaster with green acrylic paint. Wait for the paint to dry before using your coaster.


Watch the Process on YouTube!
For a more in-depth look at how I made this beautiful Pumpkin Patch Coaster, you can watch my full tutorial video on YouTube. I walk you through each step, share extra tips, and show you how to troubleshoot common issues.
Tips and Tricks:
- Bubble Trouble: If you notice bubbles forming in your resin, try using a heat gun or blow dryer to pop them before the resin cures.
- Layering Pumpkins: The layered effect adds great dimension. You can experiment with different placements to create a more dynamic look.
- Customize Your Colors: While I went for classic pumpkin orange, feel free to experiment with other colors for a more unique look. White or gold pumpkins would be perfect for a more elegant vibe.
Conclusion
And there you have it – your very own Pumpkin Patch Coaster! Not only is this a fun craft project to welcome autumn into your home, but it’s also a great way to improve your resin crafting skills. Whether you keep it for yourself or gift it to a fellow fall lover, this coaster is sure to bring seasonal joy to any setting.
Don’t forget to check out my YouTube video to follow along with the process, and be sure to share your creations in the comments or on social media! Happy crafting, and enjoy the cozy autumn vibes!