Autumn Craft Tutorial: Autumn Forest Garland
Celebrate the beauty of autumn with this fun and beginner-friendly Autumn Forest Garland project! We’ll be creating adorable fox, mushroom, and tree charms using epoxy resin and vibrant resin pigments. Once the charms are ready, we’ll assemble them into a stunning garland using twine, giving your home a cozy woodland touch. Whether you're new to resin crafting or have some experience, this DIY project is perfect for all levels!

Craft Supplies
To create your Autumn Forest Garland, gather these materials:
- epoxy resin
- mixing cups
- mixing sticks
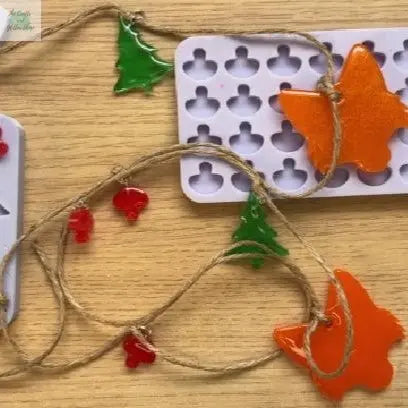
- fox silicone mold
- trees silicone mold
- mushrooms silicone mold
- twine
- jump rings
- eye screws
- red resin pigment
- green resin pigment
- orange resin pigment
- drill

Step by Step Instructions
Step 1: Prepare and Mix the Resin
Follow the instructions on your resin package to properly mix the epoxy resin. Be sure to stir slowly to avoid bubbles!
Step 2: Divide Resin into 3 Mixing Cups
Separate your mixed resin into three individual cups—one for each charm color.
Step 3: Make the Fox
- Add orange pigment to the first cup of resin. Stir until the color is well-blended.
- Carefully pour the orange resin into your fox mold.
Tip: If you have multiple fox molds, feel free to make extra! I used two foxes in my garland, but you can make more if you wish.
Step 4: Make the Trees
- Add green pigment to the second cup. Mix thoroughly.
- Pour this green resin into your tree mold. I made three trees for my garland, but feel free to make and include as many as you like.
Step 5: Make the Mushrooms
- To the remaining cup, add red pigment and stir well.
- Pour the red resin mixture into the mushroom mold. I created four mushrooms for my garland—again, adjust the amount to your preference.


Step 6: Wait for the Resin Cure
Allow the resin to fully cure according to the manufacturer’s instructions. This could take anywhere from 12 to 24 hours, so patience is key!
Step 7: Demold the Charms
Once the resin has cured completely, gently pop your foxes, trees, and mushrooms out of their molds.

Step 8: Repeat as Needed
If you want to make more charms, repeat the process (steps 1 to 7) until you have the desired number of each design for your garland.


Step 9: Prepare Clear Resin for Doming
Mix up a fresh batch of clear resin. We’re going to give some of the charms an extra glossy finish!
Step 10: Dome the Charms
Use the clear resin to dome the foxes and mushrooms, adding a beautiful, shiny layer.

Step 11: Let the Doming Layer Cure
Wait for the doming layer to fully cure. Your charms will now have a professional, polished look!
Step 12: Drill Holes for Assembly
Using a small drill bit, carefully drill a hole at the top of each mushroom and tree charm.
Step 13: Add Eye Screws and Jump Rings
Screw an eye screw into each drilled hole and attach a jump ring. This will allow you to hang your charms from the garland.
Step 14: Assemble the Garland with Twine
Cut a length of twine to the size you want for your garland. Thread the twine through the jump rings, positioning the charms as you like.
Tip: Secure each charm in place by tying a small knot to keep it from sliding.


Your Autumn Forest Garland is Complete!
Now you have a beautiful handmade Autumn Forest Garland to display in your home! It’s a perfect way to bring the beauty of nature inside, just in time for the cozy autumn season.
Happy crafting!
Follow Along with Me for Added Guidance
If you're a visual learner or just prefer to follow along with step-by-step video guidance, I've got you covered! I created a YouTube video that features this Autumn Forest Garland as part of a series of four autumnal craft projects. In the video, you’ll be able to see each step. This is a great way to get an up-close look at the techniques, especially if you’re new to working with resin or want some added tips along the way.
Feel free to watch the video and craft along with me. You’ll not only master this Autumn Forest Garland but also discover three other cozy autumn crafts to try this season. Whether you’re following this blog tutorial or the video, the project is simple, fun, and perfect for embracing the autumn spirit!